This is the short version of a full project, from a sales page to a live bonus page and promo emails. Most of the ten minutes is the AI writing while you watch. Each step has its own article with every detail.
Set up once:
- Open Bonus Builder, then the AI tab. Paste a free Google Gemini key into the Google Gemini card and click Save AI settings. Click the Test button on the card to check it. See Connecting Google Gemini.
- Open the Your Profile tab and add your name, and a photo if you like. They appear on every bonus page and sign your emails.
No AI key? You can skip step 1. See Using Bonus Builder Without AI for the same project with finished bonuses and ready-made words.
Step 1, the product:
- Click New Project.
- Paste the sales page address of the product you are promoting and click Read the page.
- Add your affiliate link and choose where the product is sold.
- Click Save and get bonus ideas.
Step 2, bonus ideas:
- Click Read the sales page and suggest bonuses.
- Read what the AI learned, then tick the ideas you want. There is no limit.
- Click Use these bonuses.
Already made bonuses for another promo? Open Reuse a bonus from another project on step 3 and copy any of them in.
Step 3, write the bonuses:
- Click Write every bonus, then Start writing. A popup shows the progress.
- When they are written, click Read and edit on any bonus to check it.
Step 4, the bonus page:
- Click Suggest six headlines and pick one.
- Choose a look. Match the sales page is a good first choice.
- Click Write my bonus page. It is saved as a draft and shows in the preview.
- Click Publish.
Step 5, delivery and leads:
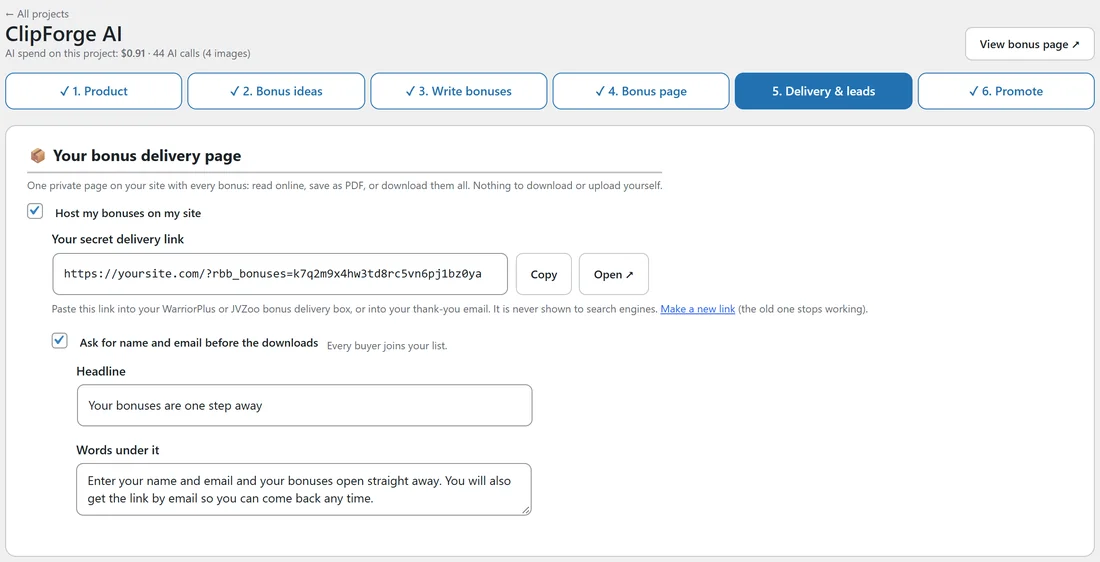
- Tick Host my bonuses on my site and click Save.
- Copy Your secret delivery link and paste it into your WarriorPlus or JVZoo bonus delivery box.
- To grow your list, tick Ask for name and email before the downloads, and Show a leave popup.
- Add a date under Countdown banner if your bonuses end on a set day, and click Save.
Step 6, promote:
- Click Write my promo pack.
- Copy the three emails into your autoresponder and the social posts into your accounts.
- Click Make it a draft post to put the blog post on your site.
The Training tab:
The Training tab inside the plugin has every step as a short lesson, with a search box at the top. Type a word such as delivery, popup or tracking and the matching lessons open with your words highlighted. Three quick-start paths show the order for a project with AI, without AI, and with the 100 Done-For-You Bonuses.
A real example:
For ClipForge AI, Sam picked the Quick Start Checklist, the 30 Day Content Calendar, the Caption Style Cheat Sheet and the Analytics Workbook. Writing all four took a few minutes each, the page went live the same afternoon, and the delivery link went into the WarriorPlus bonus box straight after.